I've been looking forward to spring and summer months, it's been such a long winter! I'm excited to share with you this sewing tutorial on how to make your own off the shoulder top from an over-sized tee shirt. There's lots of these for sale everywhere but there's something special about refashioning and making your own custom top. I wanted to create a slightly relaxed fit so I used an oversize tee to create the look.
This is one of my favorite trends for warm months. You can show a little skin yet it's fairly modest at the same time. You can style this top in many ways. Wear it with shorts, skinny or boot-cut jeans or a breezy summer skirt. It's very versatile and casual.
I plan to list this top in Etsy as soon as my inventory is built up enough. I've been so busy juggling work, recreation and my sewing, but I my goal is to continue to build enough inventory to start selling. It sure is a challenge when you're doing it all yourself! This explains why I haven't posted in a long while. I am so happy I finished this to share with all of you! 😉
My only challenge and quick fix on this project:
After completing, I tried the top on and had to make a few tweaks. Due to the top being over-sized, it almost resembled a tent and that was not the look I was going for. It also needed a little extra room in the armhole. It’s not a problem that I finished the top, these are fixes that can easily be applied afterwards. I lowered the armhole ½” for a little more room, sewed a new seam, cut and pressed. I took in the side seams 1” on each side, sewed the new seam, cut and pressed. Now it looks more fitted, but still slightly relaxed.
Materials:
- Over sized knit tee
- 1/2" elastic
- matching thread
- stretch lace trim
- chalk or fabric marker
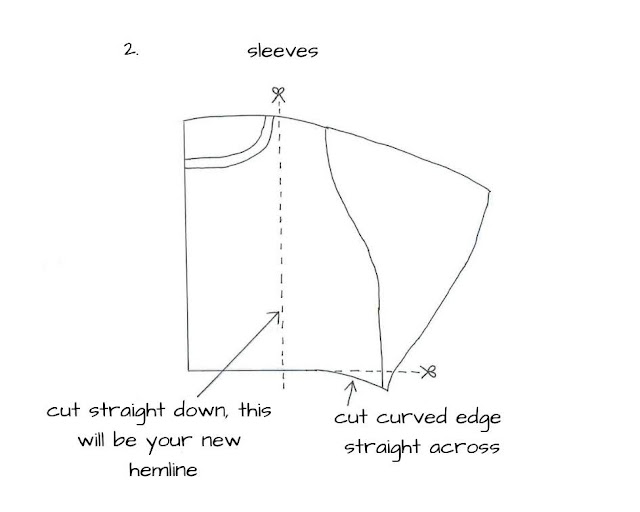
- Cut out your pieces from the tee following the diagram.
- Create the sleeves from the top pieces. Cut vertically down slightly past the neck line. There may be a slight curve at the bottom, cut curved edge straight across.
- Pick a loose top that fits you well in the arm hole. Fold in half lengthwise. Measure from point A to B. This will be your arm’s eye measurement.
- Turn all pieces wrong side out. Sew inner sleeve seems with a zig zag stitch. Rotate sleeves so the original top of sleeve is facing out to the side (as shown on diagram above). Mark on your sleeve and bodice a half U shape using your arm’s eye measurement or you can place your loose top on the fabric to trace the armhole on your bodice and sleeve. Note: you can lower the armhole if necessary. I lowered mine an extra 1/2". My seam allowance was approximately 1/2" for the whole top. Cut and sew sleeves to bodice using a zig zag stitch.
- Measure elastic around your shoulders. The fit should not be too tight or loose, for this top it seems best it gently falls off the shoulder yet stays secure. Leave enough elastic for adjustments later if needed.
- Attach a safety pin to the end of your elastic and feed through the opening all the way through. Make sure the other end of the elastic does not go through the hole. Attach end with safety pin to the fabric.
- Now is a good time to check the fit before sewing the elastic together. Lengthen or shorten the elastic if needed, then sew ends together. Close the opening with a zig zag stitch.
- Zig zag stitch lace trim on sleeve hems and bottom hem. Your top is done and ready to wear!
I hope you enjoyed this tutorial. Please refer to my note above if size tweaking is necessary. I welcome any comments or questions you may have. I'd love to hear how you create your DIY's! Thanks for stopping by! 😉
Diana💖
Diana💖


Post a Comment