


I love the look of a breezy summer top. Cold shoulder tops are still a huge trend and I created this one from an oblong gauze scarf. It was the perfect material for spring and summer.
I've been wanting to try those scarf to top transformations. It started out as an experiment taking the scarf and manipulating the fabric, draping it on the dress form. From that point, I figured out I have just enough fabric to create an off the shoulder blouse. I took a relaxed raglan sleeve blouse that fit me well and copied it into a pattern and added 1/2" seam allowance to the pattern. The blouse I chose was chiffon material and the scarf is a polyester gauze. I made sure to examine the scarf before doing all the cutting to see what I can use for the bodice, sleeves and ruffle. The good thing is the scarf was so long, it was big enough to make those pieces. I did however, forget to write down the dimensions of the scarf. I hope the pics of the original scarf below help you see how large it was. For this project, any wide and extra long scarf will work.
As I was so far into this project, I forgot to do one thing...French seams! I would suggest French seams if you choose a light gauzy fabric such as this. Since I couldn't go back and didn't do the French seams, I had to come up with something...I bound every seam with bias tape. Somehow it seemed to work (no pun intended!) Encasing the seams helped prevent any unraveling fabric that will occur sewing with fine gauze. Also, make sure to press on a low setting after sewing seams.
I love the fact an entire blouse can come from a single scarf. The only suggestion I would have is to choose a scarf that is a different fabric if you don't prefer sewing with gauze. My challenge for me was I went so far into sewing it, I didn't think to make French seams and that's what I would suggest with such a fine fabric like gauze. I also added bias binding to the sleeve and bottom hem for interest. You'll want to use the finest machine needle for gauze, I used #9 and switched back to #11 when it was time to sew the bias tape on. I broke my #9 needle on the bias tape because the needle was so skinny and material too thick! I try to learn from those little errors! 😉
The last challenge I had was the ruffle. When it was time to try the top on, I couldn't move my arms around without the ruffle moving all the way up because of the shape it was. A ruffle should either be a circle or a lengthy rectangle. Since I only had a shorter rectangle to work with and everything was already sewn on, I had to improvise and make side slits. I could not give up and scrap this blouse, I've come so far! There could've been another alternative for this - I could of cut the ruffle piece in half instead of wrapping the entire piece around. It would be like a flap on the front and one on the back. Improvising was all I had left to save my work!
This scarf was nothing more than a long and wide rectangle. All my cuts were on the fold except the ruffle. I continually made a fold and cut out the front, back and two sleeves.
Let's get to the tutorial!
Materials:
Oblong Scarf
Matching Thread
Zipper
1/4" Elastic (I used clear)
Bias Tape
Fabric Marker
Machine Settings and Equipment:
Stitch Length 3 (for gauze fabric)
Tension -2 1/2 (for gauze fabric)
#9 Needle for gauze
#11 Needle for bias tape
Zipper Foot
Here's what the original scarf looked like draped over my dress form. I forgot to log the scarf dimensions (sorry!) I hope this helps in determining a scarf size for this project. The best ones are wide and extra long. It's best to have more fabric to play with.

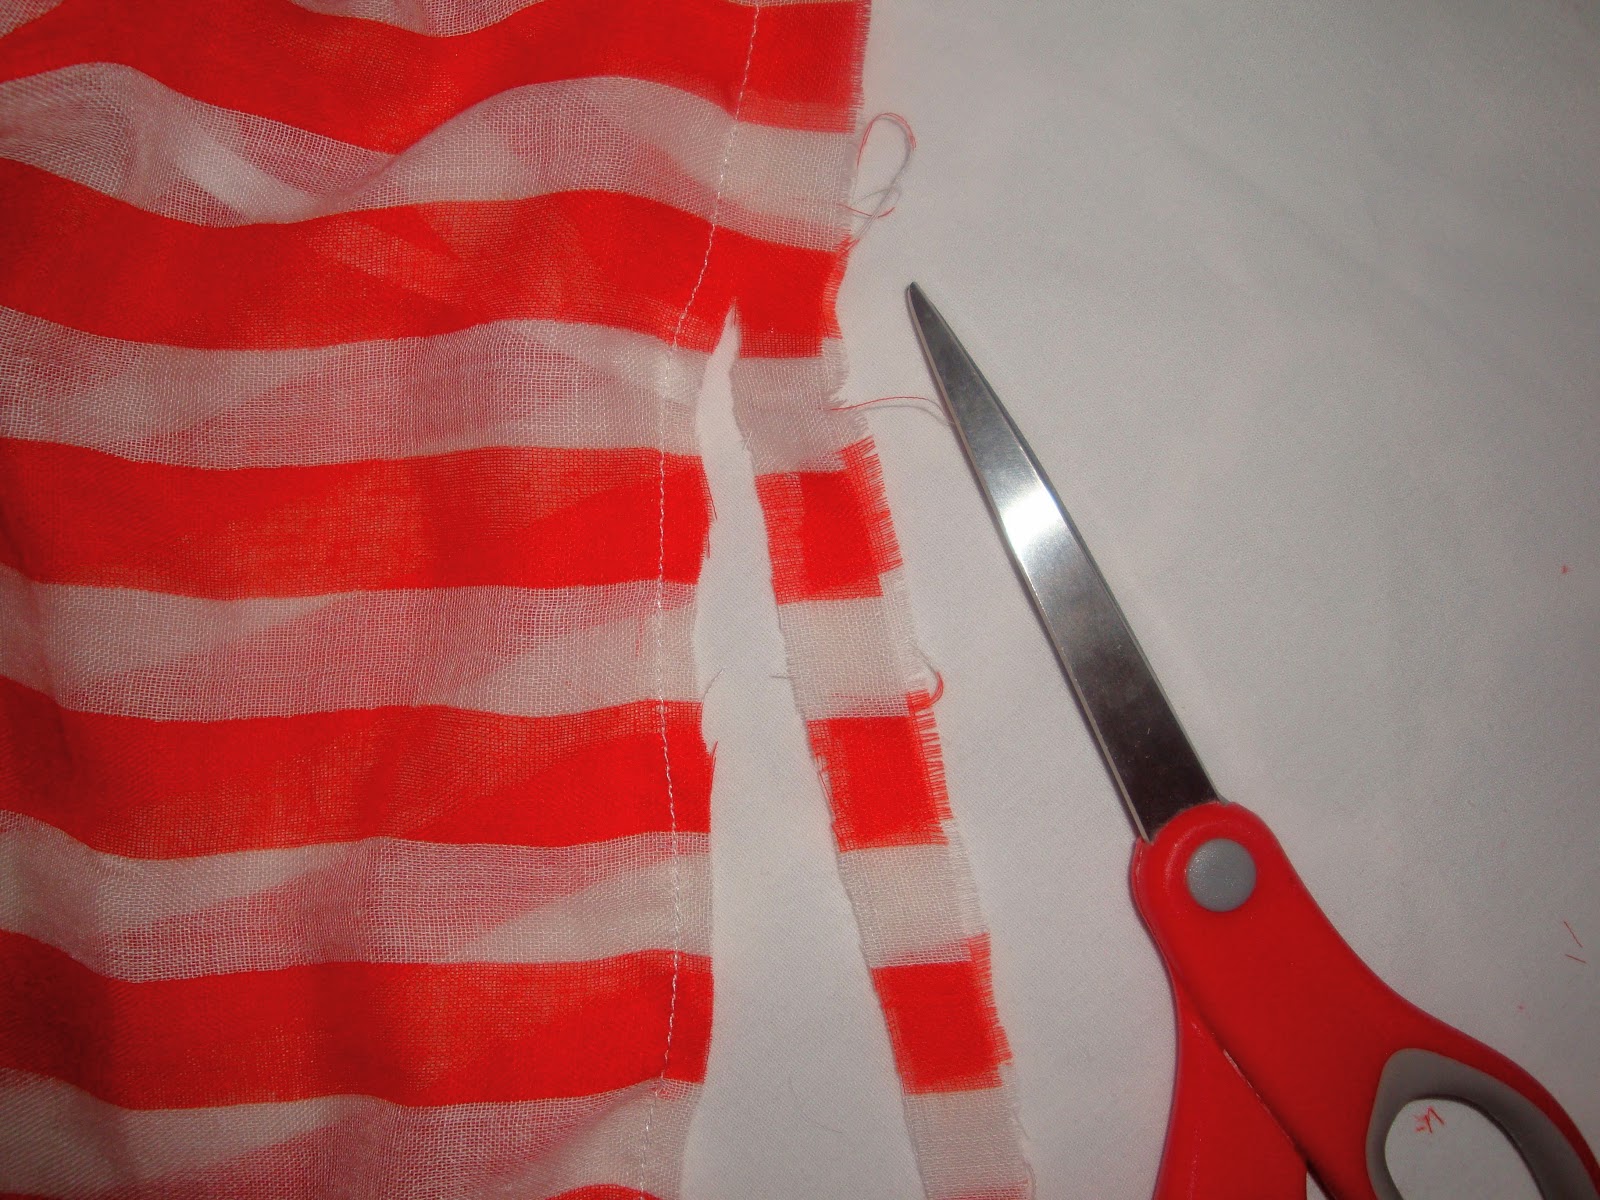
1. Place the scarf wrong side up on a table or floor. Fold over enough of the scarf so there's room to place your front bodice pattern on the fold as shown. I altered the pattern by folding the bottom under to crop it. I folded the top under so it can be an off the shoulder top. You can determine your own measurements by measuring from where you want the top to where the hem falls on your body. Cut your fabric around the pattern. After cutting, make sure to mark which piece is front and back.

2. Repeat and fold over more fabric wide enough to fit your back bodice. The back bodice is also altered the same way as the front. Place on the fold and cut.

3. This is where I come to the end of the scarf. I had enough room for both sleeves although I had a challenge that was fixable. First I folded the sleeve pattern under to make a 3/4" sleeve. This also leaves enough fabric to make the ruffle. Fold both sides of the scarf inward equal measurements to create the sleeves. I came up with 7" wide for both sleeves. My sleeve pattern fell short in width, but that's OK. I placed the folded edge of the pattern 1-1/4" past the folded edge of the fabric. Cut your fabric. Repeat for the other sleeve. I'll show you in the next step how I fix the sleeves and add width.


4. My goal was to fill the sleeve with fabric since I fell short in width. I slashed the sleeve down the middle lengthwise. I cut a strip of fabric stripes directed horizontal. The strip was big enough to fill the void in the middle and it added a little interest to the sleeve. I sewed the strip within the middle of the sleeve using 1/2" seam allowance.
5. If you're not using french seams, go ahead with these instructions. With right sides together, stitch the front sleeves to the front armholes and the back sleeves to the back armholes. With right sides together, stitch the front to the back at one of the sides from the bottom to the sleeve opening. Later, we'll insert a zipper on the other side.

6. Attach bias tape to your seams, the hem and sleeve hems. Make sure to change your machine needle to #11 when sewing on bias tape, it's much thicker than gauze. (I had my #9 on while doing this and broke my needle!)

7. Insert and stitch zipper on the other side.

8. To make the ruffle, take the remainder of the material (which should be a long piece) and cut the odd pieces off on top so you have a straight edge. You will now have a rectangular piece. You'll want the length of the ruffle to go around the edge of your top. My ruffle just happened to fit around the top.


10. Trim excess near seam.

11. Fold over seam. With right sides together, pin edge.

12. Sew a new seam 1/4" from edge. You've completed a french seam!

13. Press new seam to one side.

14. With top wrong side out and wrong side of ruffle facing out, attach the ruffle to the top, sew a straight stitch 3/4" from the raw edge.

15. Turn the top right side out. This is what it will look like with the ruffle pulled up. Your seam will be hidden underneath the ruffle.

16. Trim 1/2" excess from raw edge, open seam and press.

17. Flip ruffle over, right side facing out and press top of seam.

18. Sew a straight stitch 3/8" from the edge of the top. You are now enclosing the raw edge underneath, much like a french seam, but we're going to use this as our casing to feed the elastic through. Sew all the way around, but leave a small opening to insert the elastic.

19. Insert elastic with the help of a small safety pin attached to one end. Pull all the way through the casing. Make sure the other end does not go through. I kept my elastic on my container until I was ready to cut it, that helped me not waste any and it kept the end from going through. Tip - before sewing the elastic together, try on the top with the elastic attached by the safety pin. That way you can make any adjustments to the elastic.

20. This part was a little tricky for me because this was clear elastic, which was narrow and slippery. I chose this kind because the fabric was sheer. I decided to cut a piece of my bias tape and wrap it around the elastic ends. I sewed three rows of stitches to attach.

21. This part I didn't realize I needed until I tried the top on. I couldn't move my arms up because the ruffle was stopping me. A ruffle should really be circular in shape or a very long rectangle, but since I only had enough fabric to work with on this project, I had to improvise and make side slits. I could not give up and scrap this blouse, I've come so far with all the work I've done!
Cut a slit on each side of the ruffle, stop cutting 1/2" from top.

22. I cut a strip of bias tape longer that the slit for one side. Before sewing the tape, I extended tape over the bottom edge of the ruffle (we'll be hemming the edge over). I stitched 1/8" from the raw edge.

23. Fold the bias tape over and stitch again. I stitched 3/8" from the edge.

24. I cut one more piece of bias tape longer than the entire slit. Repeat the same as the last step. When you get close to the top of the slit, stop sewing and back stitch. We're going to flip the piece over and finish sewing the bias tape.

25. Flip ruffle to the right side. See the extended piece of tape? I folded it inward and joined the two pieces by stitching together.


27. Flip the other edge of the bias tape under the ruffle and hem with a straight stitch. Trim excess tape.
I've been wanting to try those scarf to top transformations. It started out as an experiment taking the scarf and manipulating the fabric, draping it on the dress form. From that point, I figured out I have just enough fabric to create an off the shoulder blouse. I took a relaxed raglan sleeve blouse that fit me well and copied it into a pattern and added 1/2" seam allowance to the pattern. The blouse I chose was chiffon material and the scarf is a polyester gauze. I made sure to examine the scarf before doing all the cutting to see what I can use for the bodice, sleeves and ruffle. The good thing is the scarf was so long, it was big enough to make those pieces. I did however, forget to write down the dimensions of the scarf. I hope the pics of the original scarf below help you see how large it was. For this project, any wide and extra long scarf will work.
As I was so far into this project, I forgot to do one thing...French seams! I would suggest French seams if you choose a light gauzy fabric such as this. Since I couldn't go back and didn't do the French seams, I had to come up with something...I bound every seam with bias tape. Somehow it seemed to work (no pun intended!) Encasing the seams helped prevent any unraveling fabric that will occur sewing with fine gauze. Also, make sure to press on a low setting after sewing seams.
I love the fact an entire blouse can come from a single scarf. The only suggestion I would have is to choose a scarf that is a different fabric if you don't prefer sewing with gauze. My challenge for me was I went so far into sewing it, I didn't think to make French seams and that's what I would suggest with such a fine fabric like gauze. I also added bias binding to the sleeve and bottom hem for interest. You'll want to use the finest machine needle for gauze, I used #9 and switched back to #11 when it was time to sew the bias tape on. I broke my #9 needle on the bias tape because the needle was so skinny and material too thick! I try to learn from those little errors! 😉
The last challenge I had was the ruffle. When it was time to try the top on, I couldn't move my arms around without the ruffle moving all the way up because of the shape it was. A ruffle should either be a circle or a lengthy rectangle. Since I only had a shorter rectangle to work with and everything was already sewn on, I had to improvise and make side slits. I could not give up and scrap this blouse, I've come so far! There could've been another alternative for this - I could of cut the ruffle piece in half instead of wrapping the entire piece around. It would be like a flap on the front and one on the back. Improvising was all I had left to save my work!
This scarf was nothing more than a long and wide rectangle. All my cuts were on the fold except the ruffle. I continually made a fold and cut out the front, back and two sleeves.
Let's get to the tutorial!
Materials:
Oblong Scarf
Matching Thread
Zipper
1/4" Elastic (I used clear)
Bias Tape
Fabric Marker
Machine Settings and Equipment:
Stitch Length 3 (for gauze fabric)
Tension -2 1/2 (for gauze fabric)
#9 Needle for gauze
#11 Needle for bias tape
Zipper Foot
 |
| Scarf draped over shoulders |
 |
| Scarf draped over neck |

1. Place the scarf wrong side up on a table or floor. Fold over enough of the scarf so there's room to place your front bodice pattern on the fold as shown. I altered the pattern by folding the bottom under to crop it. I folded the top under so it can be an off the shoulder top. You can determine your own measurements by measuring from where you want the top to where the hem falls on your body. Cut your fabric around the pattern. After cutting, make sure to mark which piece is front and back.

2. Repeat and fold over more fabric wide enough to fit your back bodice. The back bodice is also altered the same way as the front. Place on the fold and cut.

3. This is where I come to the end of the scarf. I had enough room for both sleeves although I had a challenge that was fixable. First I folded the sleeve pattern under to make a 3/4" sleeve. This also leaves enough fabric to make the ruffle. Fold both sides of the scarf inward equal measurements to create the sleeves. I came up with 7" wide for both sleeves. My sleeve pattern fell short in width, but that's OK. I placed the folded edge of the pattern 1-1/4" past the folded edge of the fabric. Cut your fabric. Repeat for the other sleeve. I'll show you in the next step how I fix the sleeves and add width.


4. My goal was to fill the sleeve with fabric since I fell short in width. I slashed the sleeve down the middle lengthwise. I cut a strip of fabric stripes directed horizontal. The strip was big enough to fill the void in the middle and it added a little interest to the sleeve. I sewed the strip within the middle of the sleeve using 1/2" seam allowance.
 |
| All pieces laid out |
 |
| Pieces sewn together |

6. Attach bias tape to your seams, the hem and sleeve hems. Make sure to change your machine needle to #11 when sewing on bias tape, it's much thicker than gauze. (I had my #9 on while doing this and broke my needle!)

7. Insert and stitch zipper on the other side.

8. To make the ruffle, take the remainder of the material (which should be a long piece) and cut the odd pieces off on top so you have a straight edge. You will now have a rectangular piece. You'll want the length of the ruffle to go around the edge of your top. My ruffle just happened to fit around the top.

9. Here, I'm going to close the ruffle with a French seam. Sew wrong sides together.

10. Trim excess near seam.

11. Fold over seam. With right sides together, pin edge.

12. Sew a new seam 1/4" from edge. You've completed a french seam!

13. Press new seam to one side.

14. With top wrong side out and wrong side of ruffle facing out, attach the ruffle to the top, sew a straight stitch 3/4" from the raw edge.

15. Turn the top right side out. This is what it will look like with the ruffle pulled up. Your seam will be hidden underneath the ruffle.
16. Trim 1/2" excess from raw edge, open seam and press.

17. Flip ruffle over, right side facing out and press top of seam.

18. Sew a straight stitch 3/8" from the edge of the top. You are now enclosing the raw edge underneath, much like a french seam, but we're going to use this as our casing to feed the elastic through. Sew all the way around, but leave a small opening to insert the elastic.

19. Insert elastic with the help of a small safety pin attached to one end. Pull all the way through the casing. Make sure the other end does not go through. I kept my elastic on my container until I was ready to cut it, that helped me not waste any and it kept the end from going through. Tip - before sewing the elastic together, try on the top with the elastic attached by the safety pin. That way you can make any adjustments to the elastic.

20. This part was a little tricky for me because this was clear elastic, which was narrow and slippery. I chose this kind because the fabric was sheer. I decided to cut a piece of my bias tape and wrap it around the elastic ends. I sewed three rows of stitches to attach.

21. This part I didn't realize I needed until I tried the top on. I couldn't move my arms up because the ruffle was stopping me. A ruffle should really be circular in shape or a very long rectangle, but since I only had enough fabric to work with on this project, I had to improvise and make side slits. I could not give up and scrap this blouse, I've come so far with all the work I've done!
Cut a slit on each side of the ruffle, stop cutting 1/2" from top.

22. I cut a strip of bias tape longer that the slit for one side. Before sewing the tape, I extended tape over the bottom edge of the ruffle (we'll be hemming the edge over). I stitched 1/8" from the raw edge.

23. Fold the bias tape over and stitch again. I stitched 3/8" from the edge.

24. I cut one more piece of bias tape longer than the entire slit. Repeat the same as the last step. When you get close to the top of the slit, stop sewing and back stitch. We're going to flip the piece over and finish sewing the bias tape.

25. Flip ruffle to the right side. See the extended piece of tape? I folded it inward and joined the two pieces by stitching together.

26. I don't think there's a right or wrong way for this. I just stitched together to form a V shape.

27. Flip the other edge of the bias tape under the ruffle and hem with a straight stitch. Trim excess tape.
Finished and ready to wear! 😀 I will admit sewing with gauze was not simple. It shifts and is very delicate. I don't know why, but I think I did it because I like to challenge myself at times. I may need a complex project so I can continue educating myself.
Many scarves come in different fabrics and you can choose any kind you wish. There's light summer weight and thick cozy fabrics for cool months. I think this would be very beautiful made from a pashmina scarf for fall! I certainly hoped you enjoyed this tutorial, thanks for stopping by! Happy sewing!!
Diana 👗😉


So very cute and always fashionable! Fine directions and explanations. Very nice!!
ReplyDeleteThank you so much Jane! Off the shoulder tops have been trending for many years, I'm glad they're still popular. I'm really loving them! Have a great day!
ReplyDelete