Good day sewers! I've been stumbling on posts about making dresses and skirts from tablecloths, this really intrigued me. I love to create clothes from upcycled fabrics like tablecloths, sheets and curtains. I thrift often and the only challenge is finding a tablecloth that's clean, spotless and a cute print or nice solid color.
I found 2 white circle tablecloths 72" round at my local Goodwill and I couldn't pass them up. I thought these could make the perfect circle skirt, they were the shape I was looking for. As I was cutting up my first tablecloth, I realized I had enough for the skirt, waist band and bodice. The best part was I was able to make this entire dress from one tablecloth! I didn't use any pattern for this dress. The skirt was just a circle skirt I drafted from my own measurements. I made the bodice by copying a dress top that fit me well. I modified the top and the back by redesigning the neck line to form a more modest V neck and back. It's just a personal preference I have, I like a modest top where my chest is concealed.
The circle skirt ate up the most of the tablecloth. What I had leftover looked like a gigantic ring of fabric. It was just enough to create the pieces for the bodice and the waistband for a medium sized dress.
I was going for the 50's retro look. My inspiration was Elizabeth Taylor in Cat on a Hot Tin Roof (1958). I can see that her dress was layered with white chiffon. Mine is not exactly the same, but the silhouette is similar and I'm pleased with how it came out. It's made to my measurements, it fits so well and I've worn it so many times!
So you're aware, this tutorial is a biggie. There's 107 photos and 53 steps. Personally, I could of made the bodice very simple, but no, I just had to go all out couture and challenge myself. This dress can be very easy, if you make a bodice that is 2 pieces. You can always modify it. Please sit back and enjoy browsing! On with the tutorial!
Materials:72" Round Cotton TableclothSewing ThreadDouble Fold Bias TapeSew-on SnapsCrochet Thread
ToolsFashion Ruler
Yard Stick
Measuring Tape
Fabric Marker
Crochet Hook size 2
Instruction Notes:Seam allowance 1/2"1. First thing I did was create the circle skirt. Here is the formula I followed.Waist measurement divided by 3.14. My waist is a 29"
29 divided 3.14 = 9.24.
I took 9.24 and divided again by 2 = 4.62 which is 4-5/8". I used this measurement because I folded the cloth in 4 quarters.
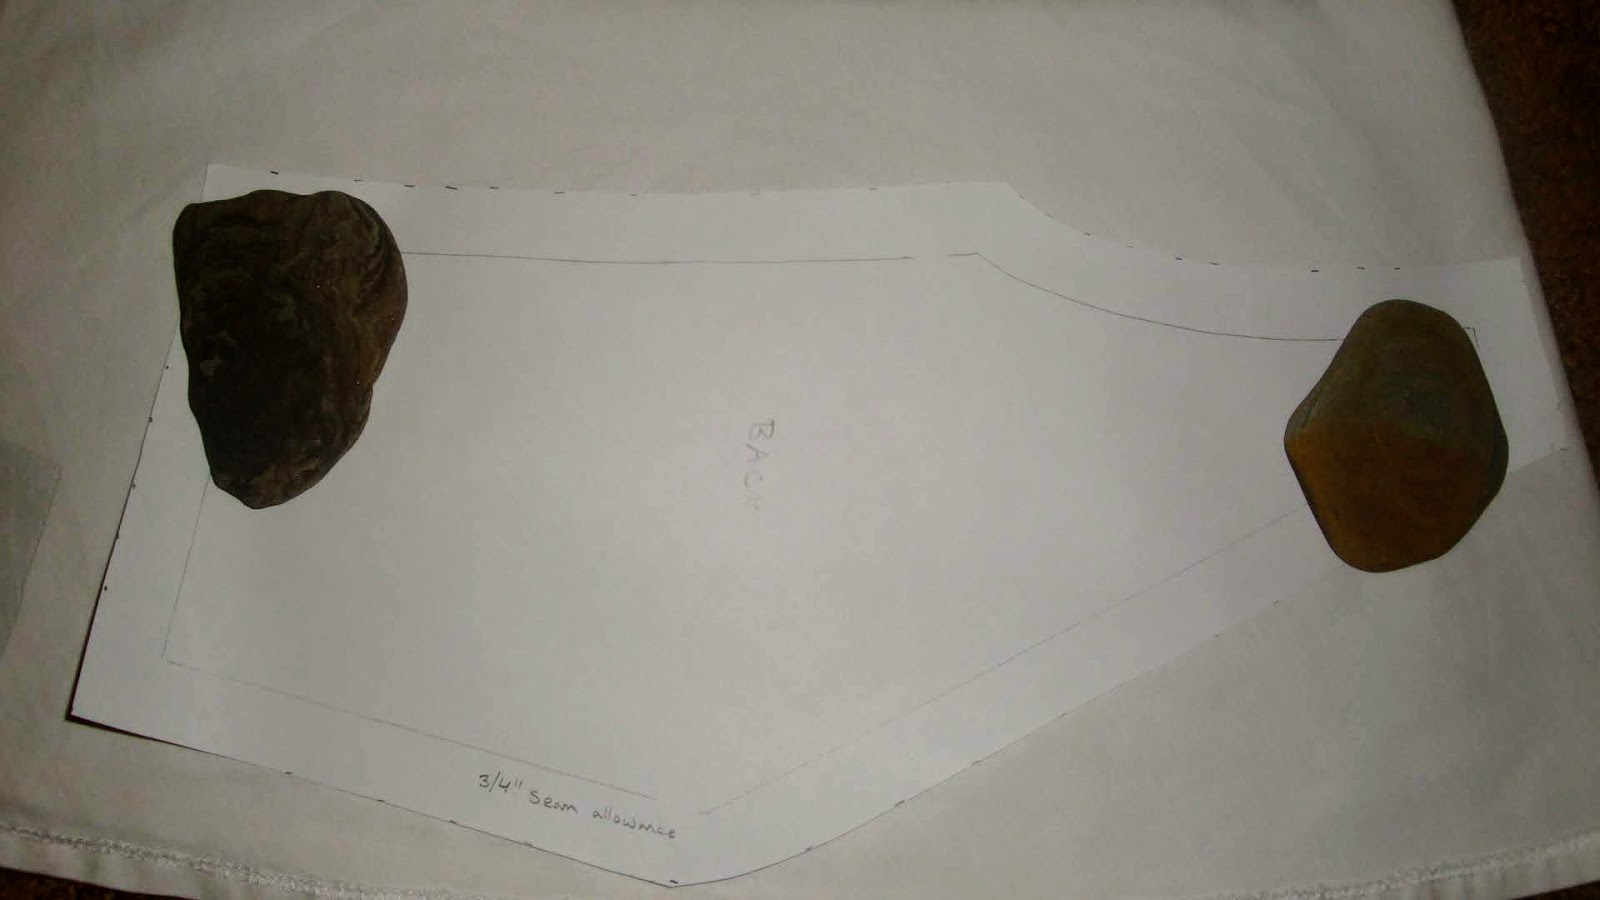
Fold tablecloth in 4 quarters and mark the measurement from the top going down, mine was 4-5/8".2. Cut top piece off along the dotted line.3. Open up skirt halfway and measure length desired from waist.Measure from the waist the hem length you would like. I wanted a 22" length on my skirt.4. Marked 5/8" hem allowance.5. Cut on the cutting line (not your seam allowance) all the way around.6. Cut one side all the way for the zipper insertion. |
| Front Bodice |
7. Take a dress with a fitted bodice that fits you well and we're going to use it to make the top.
Pin the seam lines of half the bodice to paper attached to a board. As you can see , I also pinned the princess seams. I omitted one of them which I'll show you next. I kept the princess seam closest to the side seam and omitted the one near the middle of the bodice. |
| Back Bodice |
8. I repeated the same step for the back bodice. |
| Front Bodice Trace |
 |
Back Bodice Trace |
9. Remove the pins and you'll use the pin holes to connect the dots and trace.
I wanted to re-design the neckline as a more modest v neck and back. On the front I raised the neck line 1/2" and drew a diagonal line from the shoulder to the neck. On the back, I drew another diagonal line from the shoulder to the middle of the back. The lines in red are my new design line. |
| Cut out patterns and the and the sides(sorry I forgot to show) Here I'm drafting a new pattern with seam allowances |
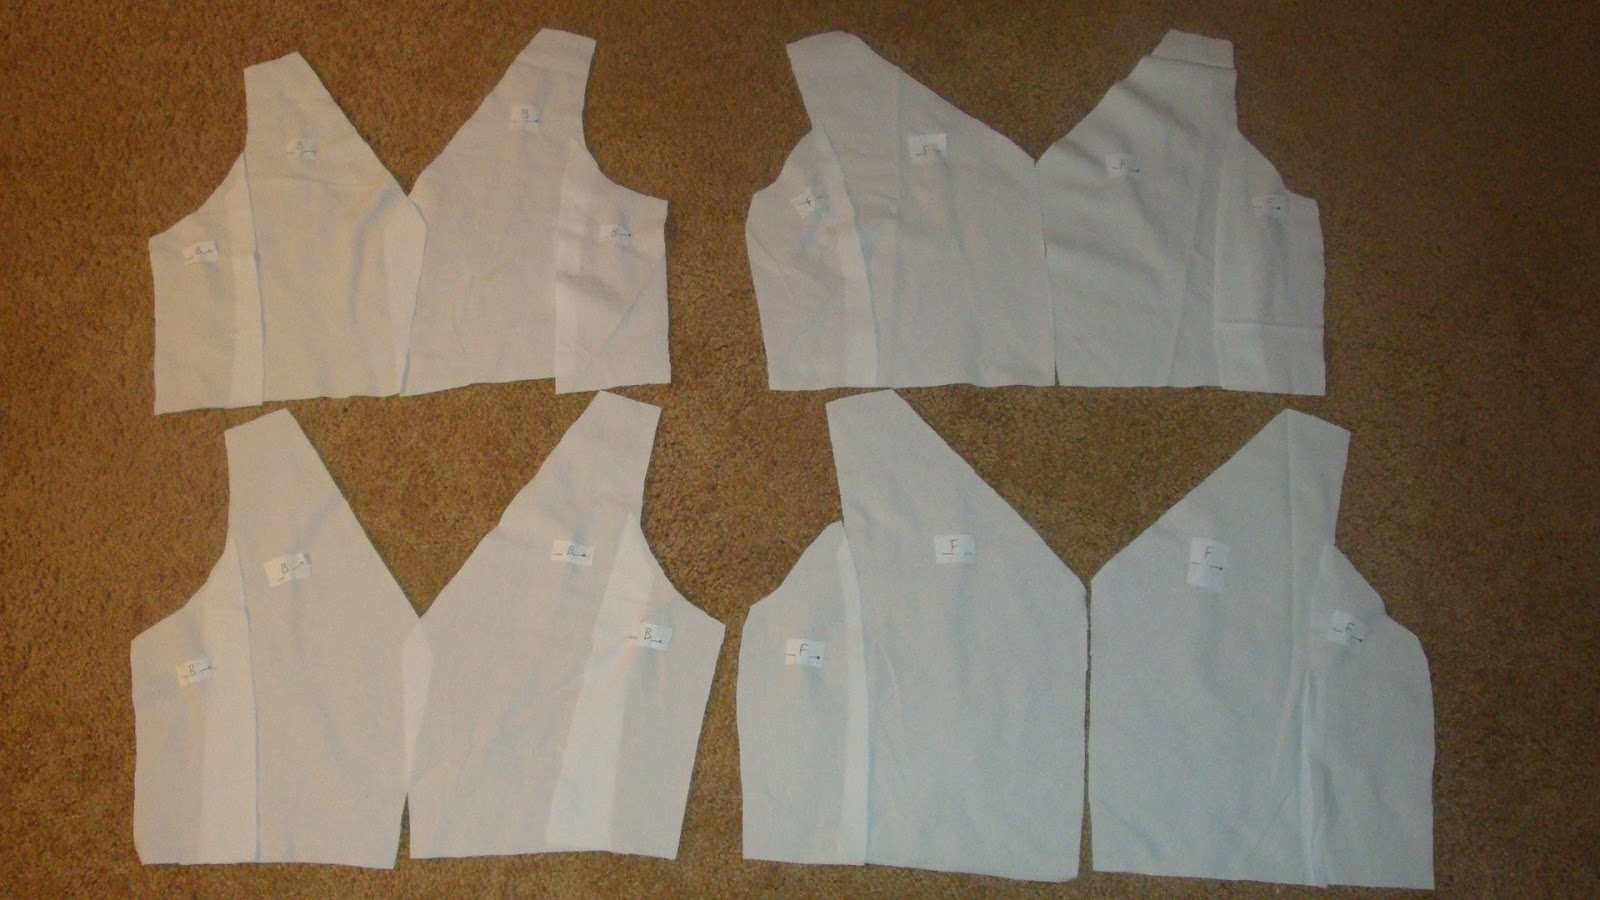
10. I had to draw a new pattern so I could add seam allowances. I added 3/4". I did a little extra in case I needed more ease. Later on when I was fitting myself, I realized all I needed was 1/2" seam allowance. You'll see in my pics I have marked on my pattern 3/4". I forgot to remark my patterns. Cut out the new pattern at the cutting line. |
| See how much I had left after cutting out my skirt? It was still plenty for the bodice, lining and waist band |
11. Cut 4 front pieces and cut 4 back pieces. I used this fabric for the bodice lining too. |
| Still have extra for that waist band |
12. Waist band - Measure your waist. Mine is 29" I drew a rectangle 35" x 6". I wanted to make extra room for ease if I needed it. |
| Getting ready to assemble the waistband |
 |
| Fold the waistband in half and attach raw edges together with pins |
 |
| Sew a straight stitch |
 |
| Finished seam with a zig zag stitch and trimmed |
13. Sew the waistband to the circle skirt as shown above. Sew 1/2" seam. Sew a straight stitch, then finish with a zig zag stitch and trim excess.14. Assemble the bodice. All my seam allowances are 1/2". Front bust darts are 1-1/2" wide and 5" height. This was a good time for me to label my pieces. Front fabric, back fabric, front lining, back lining. Even though I used the same fabric for the lining, I had a some marks on the fabric I wanted to hide, so I used those pieces for the lining instead. I kept these little tags pinned on until I had most of it assembled. I needed some way to remind myself which ones are fabric and lining. |
| Front |
 |
| Back |
 |
| Side (this armhole will be lowered, which I do later) |
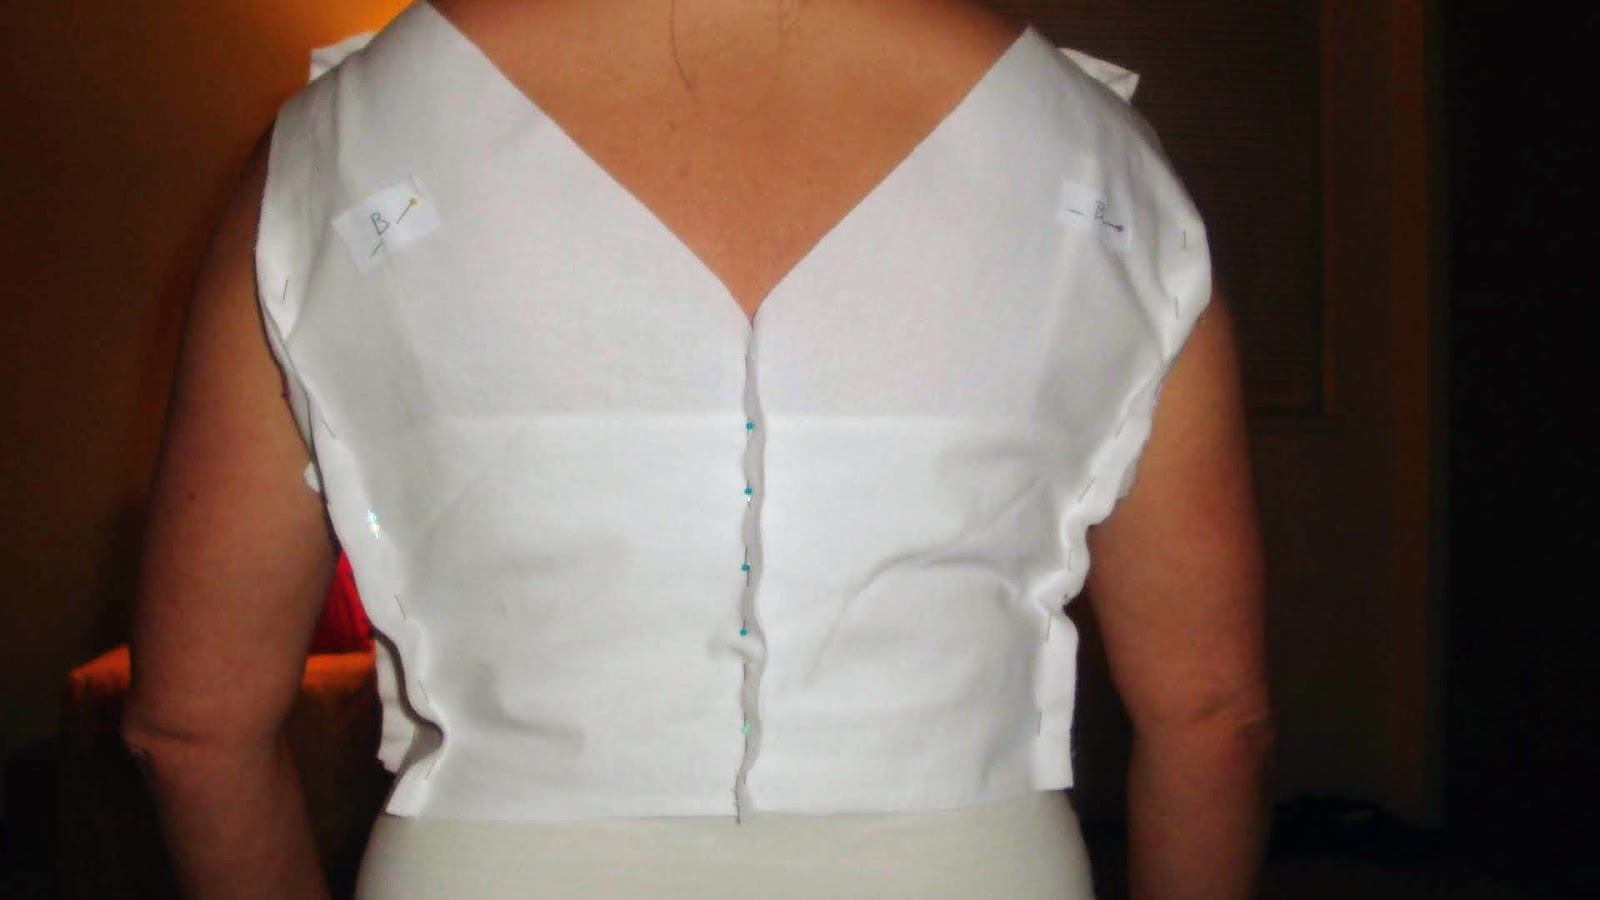
15. Before assembling the bodice, this is where I had to do some fitting and find where my darts need to be marked. I pinned the fabric of the bodice all together to see first what it looked like on my dress form. I just needed an idea to see how it looked. |
| Playing with dart placement |
 |
| Playing with dart placement at the waist - still needs modifying when I try it on... |
 |
| I moved my bust darts way down - some of us do not resemble mannequins! |
 |
| Checking the back - looks good |
16. My dress form's bust point is much higher than mine, so I had to place the bodice on myself and fit it. As you can also see below, I was playing around with where to put the higher dart. I ended up remarking it further down. The left darts on me may look crooked only because I was kneeling on my right knee to get in the picture! I also believe I have a slight asymmetrical shape that causes my tops to fall to one side. The good thing is the weight of the skirt will pull the darts down. |
| Bodice front - now back on the dress form |
 |
| Bodice back on the dress form |
 |
| Bodice side on my dress form |
 |
| Close up of the dart I created |
17. The top four pics show the bodice back on the dress form to see the fit. The true fit was on me, but I also like to see what it looks like draped on my form. Notice I labeled every piece with a tag so I wouldn't get lost as I was putting it together. I don't remove these until later.18. Mark darts with fabric pen |
| Shape darts with fabric marker after removing pins |
 |
| Knot thread ends of darts |
 |
| Both front and lining pieces with darts sewn |
 |
| Trim excess from darts |
19. Remove bodice from dress form and remove pins from darts. With the fabric pen, you can define the darts more. Sew darts and tie thread ends with a knot. Trim excess from the darts. |
| Press Darts |
20. Press darts on both fabric and lining pieces. |
| Here's my side pieces - the armhole is too high |
 |
| I trimmed all pieces to fit under my arms comfortably |
21. Trim bodice side pieces to fit armhole if they're too high. |
| Sew side pieces to the bodice and lining, trim excess |
 |
| Press seams - this is a good time to trim the armhole further if it's still too high before sewing it together |
22. Sew back side pieces to the back bodice and lining. Sew front side pieces to the front bodice and lining. Press seams. This would be a good time to trim the armholes further if needed. |
| All my bodice pieces laid out and ready for sewing together |
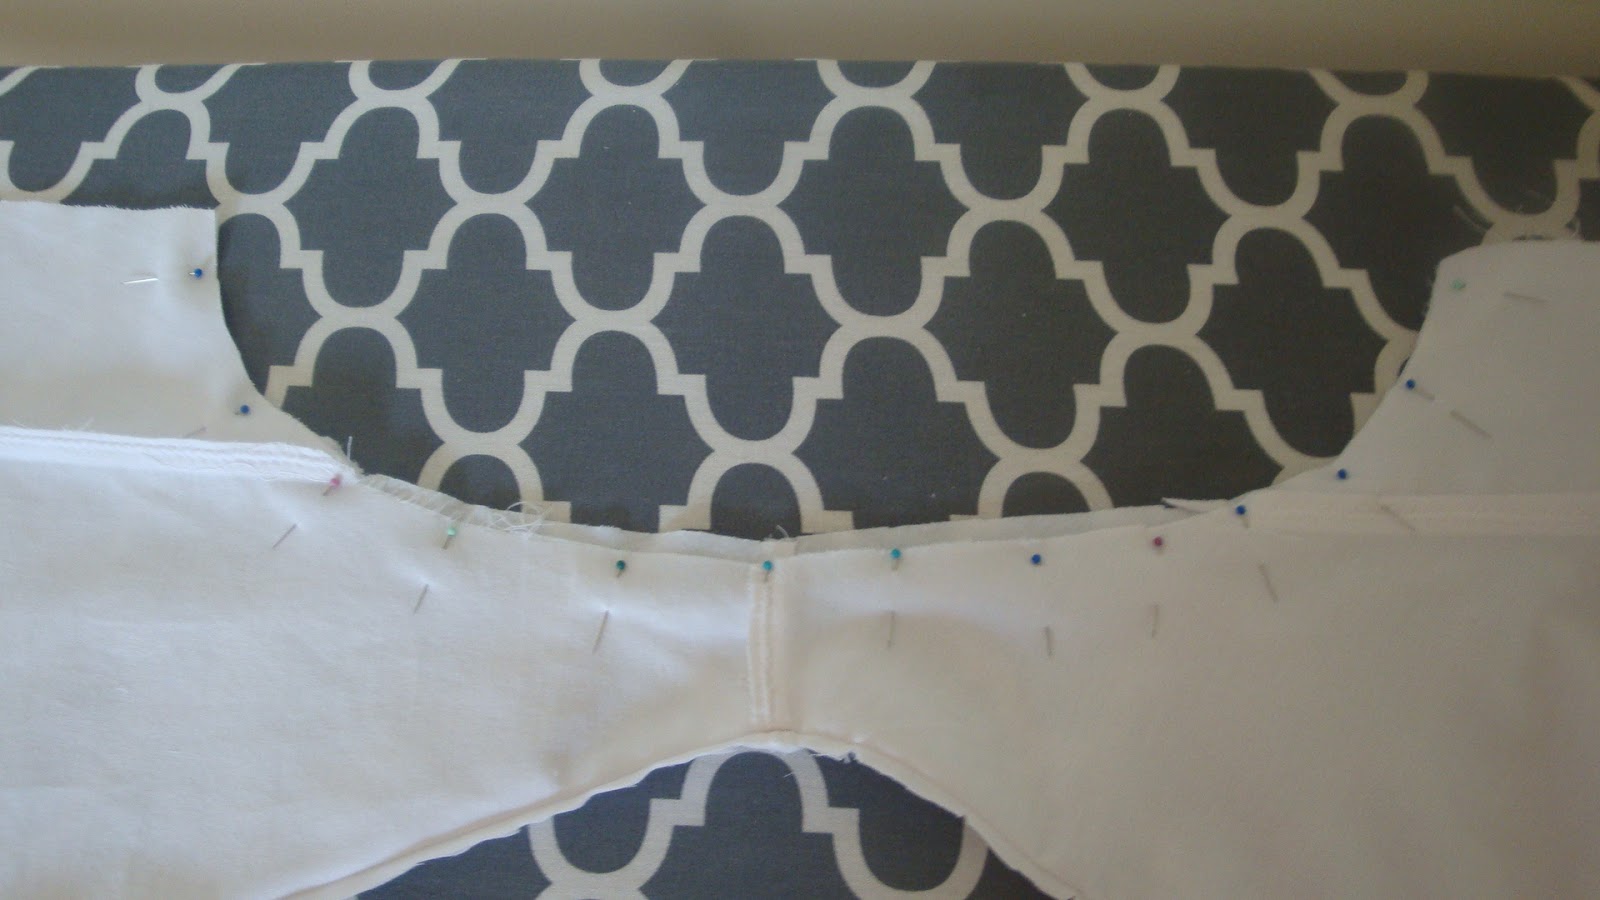
23. Lay out all the pieces and double check if all is completed. Stay stitch neckline of fabric and lining pieces.
24. With right sides facing together, sew the shoulders together of the front and back lining pieces. Repeat with the fabric front and back pieces. Zig zag stitch raw edges, trim excess and press seams.25. With right sides together, join the fabric and the lining pieces together at the neck. Pin the lining to the fabric around the neckline and match shoulder seams. Stitch around neckline. |
| Clip curves |
 |
| Trim as close as possible to the where the "V" is |
26. Clip curves in and trim as close as possible to wear the "V" is. Be careful not to cut the seams. |
| Press seam allowances away from the bodice to prep for under stitching |
27. Now we're going to prep for under stitching the seam allowances. Press the seam allowances and lining away from the bodice. With the seam allowances furthest up, under stitch the seam allowances to the lining, close to the seam line, all around the neck line. Trim the seam allowances close to the under stitching.
 |
| Pin lining to bodice at armholes |
 |
| Stitch at armholes |
28. Join the bodice and lining at the armholes. Pin the lining to the bodice at the armholes, right sides together and matching the lining shoulder seams to bodice shoulder seams. Stitch around both armholes. |
| I used a seam roll to press as far as it would go. |
 |
| When my seam roll can't go any further, I rolled up a sock and stuffed it in the narrowest part of the shoulder |
 |
| Gently press |
29. Insert a seam roll or towel as far as it will go and press seams. I ended up rolling up a sock, stuffed it in the narrowest part of the shoulder and pressed. |
| When I couldn't stitch the underlining further, I hand stitched the rest here |
 |
| Trim excess after under stitching |
30. Under stitch the armhole seam allowances to the lining, close to the seam line - you won't be able to get into the shoulders, but stitch as far as you can. When I couldn't stitch any further, I hand sewed the rest. Trim the seam allowances close to the under stitching. |
| I started turning the bodice here with my hand |
 |
| When I reached the shoulder, I pinched and grasped it with my fingers |
 |
| I kept pulling |
 |
| Almost there! |
 |
| Completely turned! |
31. Now it's time to turn the bodice right side out. Gently pull each back bodice piece right through its shoulder to turn the whole bodice right side out. You can use a chopstick or similar object to push the material through. Turns out I didn't need any tool, I just used my fingers to pinch and pull the fabric through.
32. Press the bodice, rolling the lining slightly to the inside so the seam line is not visible from the right side. |
| Place front and back bodice right sides together at the side seams - looks like this |
 |
| closer look of pins at side seams |
 |
| Stitch down the bodice and lining side seam |
 |
| Finished seam with zig zag stitch. Trim and press seam |
33. Now we're going to finish up the bodice. Place the front and back bodice pieces right sides together at the side seams. Pull the front and back linings up and away from the bodice. Pin the front and back bodice at the side seams. then pin the front and back lining at the side seams, matching the seams where the bodice meets the lining. Stitch down the bodice and lining side seam. Repeat on the other side seam. Trim the seam allowances and press them open.34. Here, I sewed bias tape on the raw edge seam of the waist and skirt on the inside. I finally sewed the bias tape downward so it lays flat.35. Trim any excess of the skirt ends. I had a little extra on the waistband sticking out. I guess I added a little too much on the waist! It's time to start sewing the skirt together. |
| pin the back of the skirt up to where the zipper will start |
 |
| Here I'm checking zipper placement before attaching bodice |
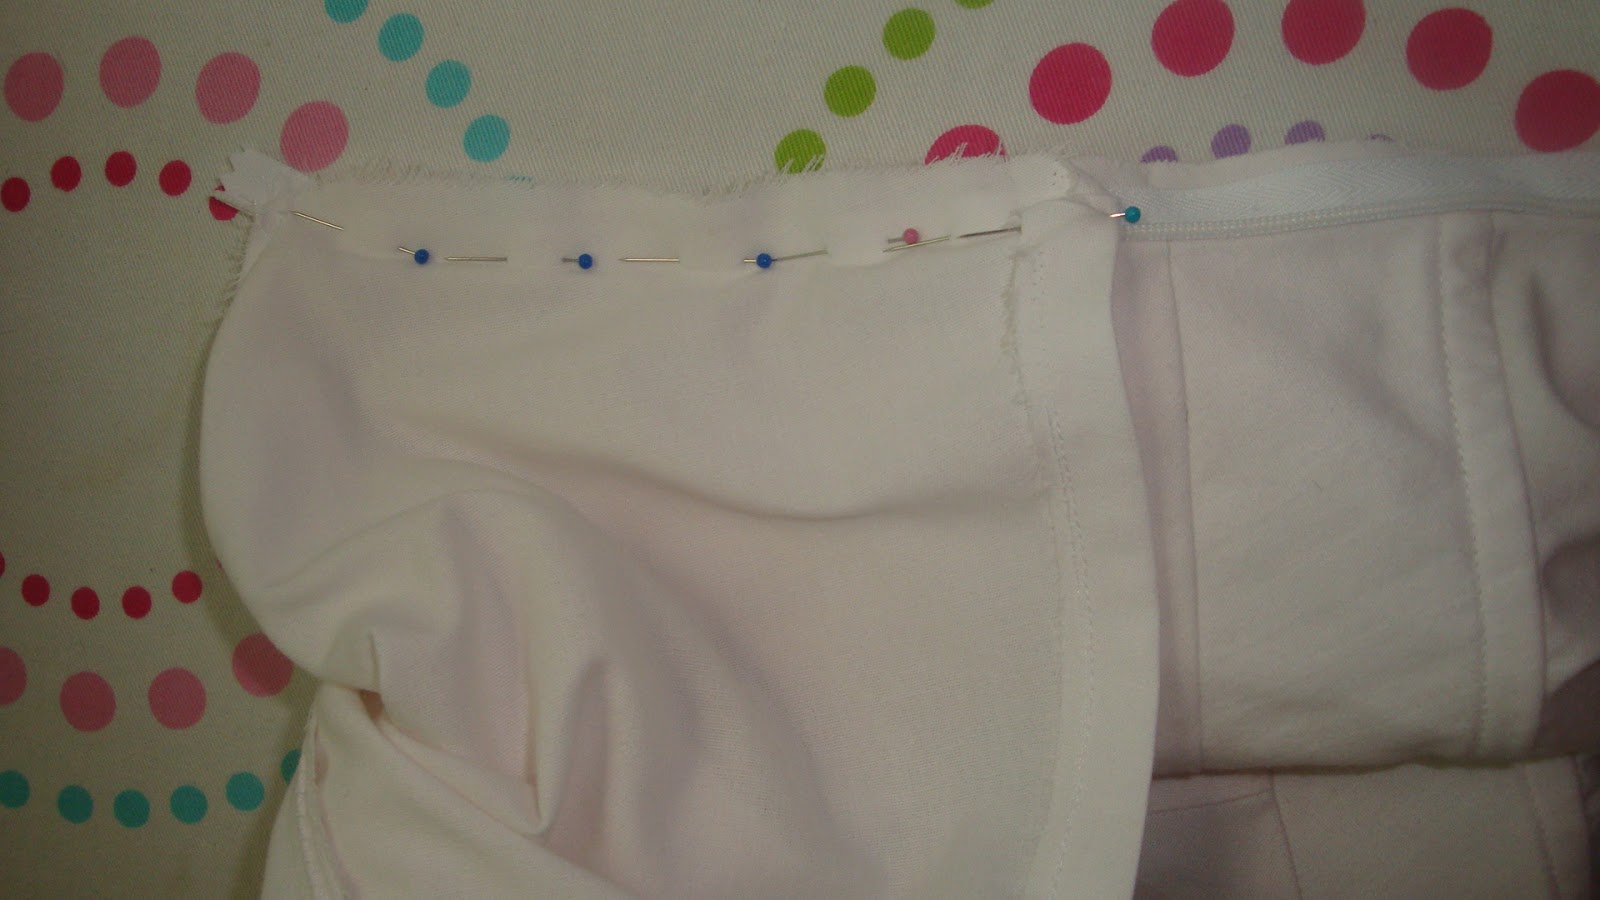
36. Now I'm going to attach the back zipper. Start by pinning the back seam of the skirt to wear you want the zipper to start. |
| Here I'm attaching the top of the skirt to the bodice |
 |
| sew a straight stitch |
37. Attach the top of the skirt to the bottom of the bodice. Sew a straight stitch.
 |
| zig zag stitch near raw edge and trim excess |
 |
| Press seam |
38. Finish seam with a zig zag stitch and trim. Press seam.39. Press back of skirt seam flat from the bottom of the skirt to the bodice top.  |
| Start to attach and pin zipper - this is the top of the zipper. Make sure the lining is up and out of the way |
 |
| Make sure the waistband matches up evenly on both sides - zip it up to check |
40. Insert the zipper into the center back opening. Check the fit of the dress and adjust the center back seams if you must. With the lining pulled out of the way, press the back opening seams to mark where the zipper teeth should go - (on the bodice and skirt, not the lining) Align the top stop of the invisible zipper with the neckline at the center back and pin in place.  |
| Use a zipper foot and start sewing the zipper with a straight stitch |
 |
| Sew as far as you can to the zip stop. Here I stopped, back stitched, took off the machine, zipped up the zipper a little further, put back on the machine and finished stitching to the end of the zipper. Repeat on the other side of the zipper. |
41. Keeping the lining out of the way, stitch the zipper using a zipper foot. Press the seam allowances open.
 |
| After the zipper is sewn, zip it up to make sure the waistband matches up on both sides. |
 |
| Checking the fit...so far so good |
42. Double check the zipper. Zip it up and make sure the waistband matches evenly. It's also a good time to double check the fit.
 |
| Remember the lining we moved up and out of the way? Now we're going to hem this. Pin as shown. |
 |
| Stitch with a straight stitch |
43. Turn the hem of the lining and stitch. |
| Now it's time to attach the lining to the zipper - this is what it looks like with the lining unattached to the zipper |
 |
| Flip the lining once again wrong side out - Attach the raw edge to the zipper |
 |
| Using a zipper foot, sew a straight stitch, attaching the lining to the zipper |
44. Now, we're going to attach the lining to the zipper. Turn the lining wrong side out and pin the raw edge to the zipper. Change over to your zipper foot and sew the lining to the zipper as shown. |
| Turn it right side out, this is what it should look like, raw edges are neatly concealed |
45. Once sewn, turn the lining right side out. This is what it should look like. |
| Here is what it looks like zipped up from the inside |
46. Here is a pic from the inside zipped up. |
| Here, I'm enclosing raw edges with bias tape |
 |
| More bias tape - all the way |
47. Here, I attached double sided bias tape to the zipper seam all the way down. |
| First, stitch the tape |
 |
| Stitching.... |
 |
| Closing the bias tape on the zipper with zipper foot |
 |
| Closing the bias tape on the seam allowance on the skirt |
48. First, stitch the tape down on the seam, then stitch again closing the tape.49. Slip stitch the lining to the inside of the waistband. It should reach to the waistband area. |
| Press up the hem for sewing |
 |
| Turn once more to enclose raw edge, pin in place |
50. Press up the hem for sewing, turn hem again and pin to desired hem. |
| Checking hem length....looks good |
 |
| Sew a straight stitch on the hem |
51. Double check length of hem. Sew hem with a straight stitch. |
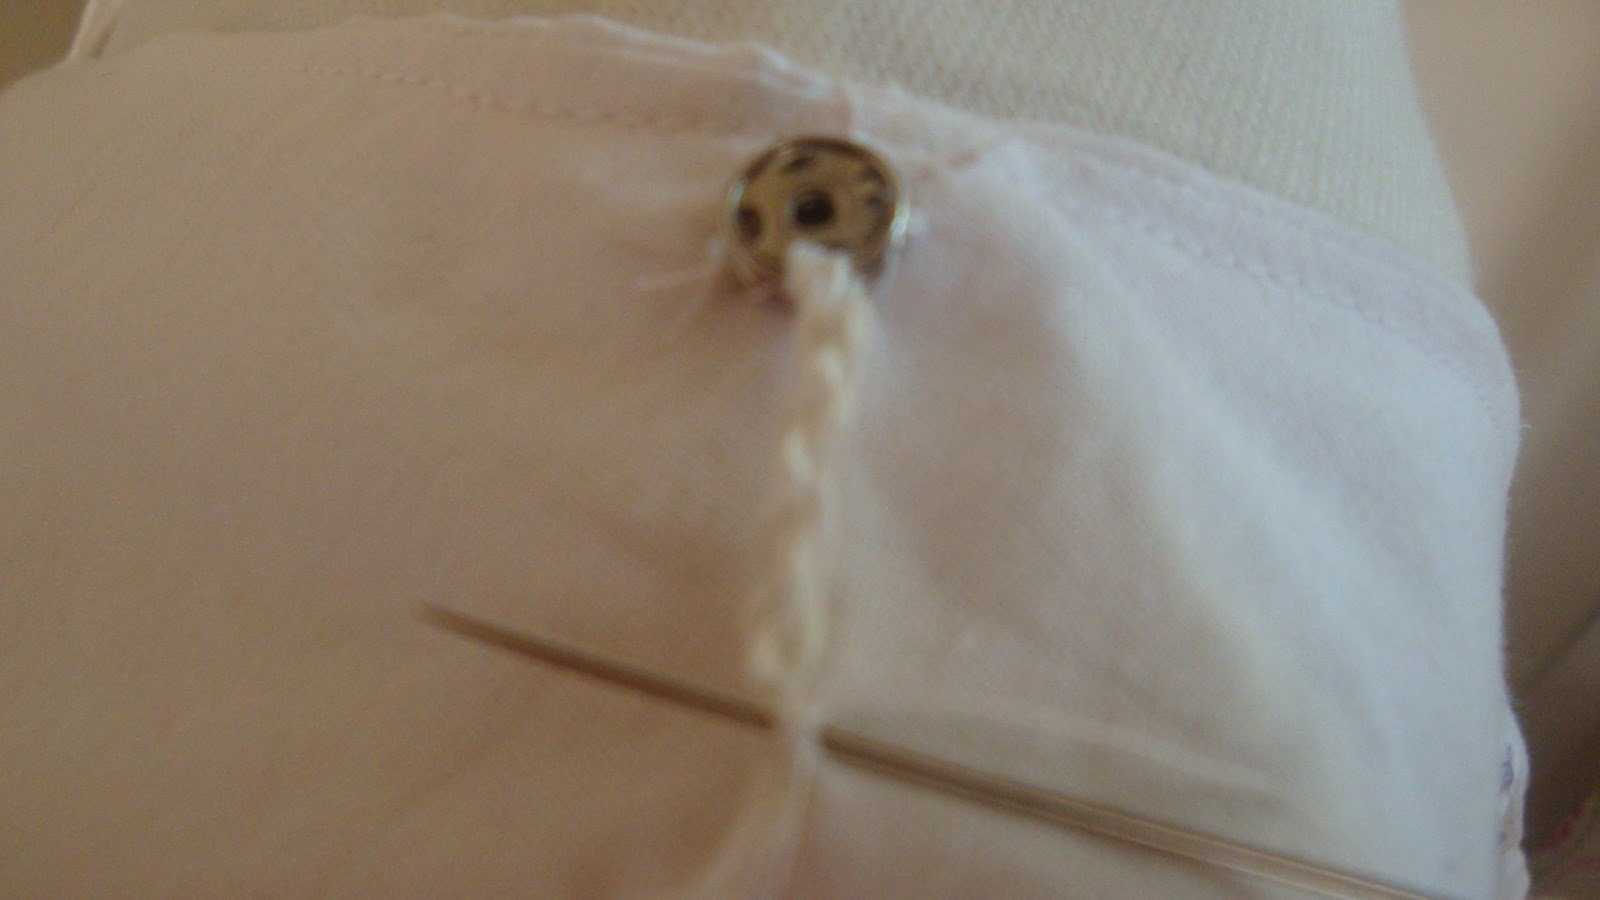
| Now to attach the bra stays - Sew the first snap where you'd like it. |
 |
| Here, with my crochet hook, I crocheted about 7 chain stitches |
52. I decided to attach bra stays to this dress to make it special and these are so helpful in keeping your bra straps hidden. Start by hand sewing a snap on the wrong side of the shoulder as shown. I used some crochet thread and one of my skinniest crochet hooks and crocheted about 7 chain stitches.
 |
| Attach looped end to another snap and tighten the knot. |
 |
| Attach snap to the other snap already sewn on. Start sewing the end of the crochet thread with regular thread and fasten with a tight knot. |
 |
| Bra stays are finished! |
53. Take your other snap and attach the looped end of the crochet thread to the snap and tighten the knot. Cut the end of the thread. Sew the end of the crochet thread with regular thread, tighten with a knot and trim off excess. Here is the finished look. This is a great way to keep your straps in place. I've seen this little feature on some dresses and tops I already own.
This finally completes the tutorial! It was a bit extensive, but I enjoyed the process of creating this custom dress. I've already worn it several times, mainly to work and received many compliments. Just one time, I walked through Joann Fabric wearing this dress and I saw a lady staring at me and I could see she was looking at my dress. I wish I said, yes I made it and thank you! I hope to receive your feedback and comments on this. I would love to hear if you tried anything like this or if you have any tips or suggestions, I would so much appreciate hearing from you!
I hope you enjoyed viewing this! Thank you for visiting!
Diana


%20copy.png)


Post a Comment